Documental de National Geographic de como se formó el planeta Tierra.
domingo, 31 de julio de 2011
sábado, 30 de julio de 2011
POSES DE MODELOS ARTÍSTICAS
Poses de modelos artísticas Adobe Photoshop.
Desnudos artísticos.

.... y muchas más.
Si quieres bajarte el paquete completo pincha aquí.
Desnudos artísticos.

.... y muchas más.
Si quieres bajarte el paquete completo pincha aquí.


miércoles, 27 de julio de 2011
GELES PARA FLASH
Recientemente he realizado un pedido, desde EEUU a Canarias, concretamente he tardado 7 días en recibi de geles para flash que sirven para corregir la temperatura de color en una misma escena.

He realizado un pequeño videotutorial donde doy a conocer estos geles, como conectarlos al flash y para que se utilizan principalmente.
Geles para flash de la marca Rosco.


He realizado un pequeño videotutorial donde doy a conocer estos geles, como conectarlos al flash y para que se utilizan principalmente.
Geles para flash de la marca Rosco.


martes, 26 de julio de 2011
BRICOLAJE COMO REALIZAR UN PANEL SNOOT PARA NUESTROS FLASHES
Dentro de mis apuntes de fotografía, he conseguido este bricolaje de como realizar un panel snoot para nuestros flashes.
DIY: Black Straws Snoot Grid (Part 1)
Hi again and welcome,
here is a new idea you can start doing by yourself.
When I was on one of my trips, this time to London, for a great Strobist Seminar we went into a Mexican restaurant and as by David advice on getting all the Black Straws you could pick I decided to try my luck.
I ask the waitress if I could get some black straws and she just said grab the one's you like... so as you can imagine I took 2 hands full of it !!!! :)
Later on I decided that was time to put together the so talked snoot grid but I could not imagine how to assemble it, since I have never did it before. I then realized that a lot of people also did not bother to assemble it, maybe because of lacking how or because they simply did not know what was it all about.
In this 2 parts simple "Do It Yourself" we take a look first on how to assemble the "THING" and then on the second part I will do some examples on what you could come up with them.
Hope you enjoy it and come back soon for the second part.
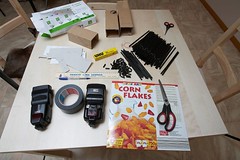
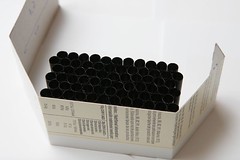
Working table with all the gear needed to assemble the Black Straws Snoot Grid.
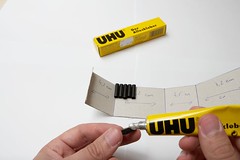
- Black duct tape
- Cereal Box (Any type or any kind)
- Scissors
- Glue
- Hand full of Black Straws (0,5 cm diameter)
- Ruler
- Portable flash to try it out later
- Pen
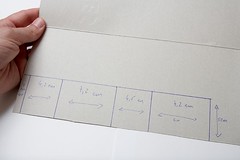
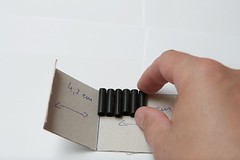
This is the design on the cereal card box for the 2cm Black Straws Snoot Grid. There is an error on the calculation between the picture and the real thing since I have some Velcro at the flashes end and it gives 0,2cm more to each side (If you have the Velcro at the end of your flash use the measures on the picture instead), sorry but I only noticed it now here goes correct the measures:
1cm, 4,5cm, 7cm, 4,5cm, 7cm and length 5cm
This will give 2cm for the straw and the other 3 to fit in the flash and will fit on SB26 and 580EX
This is the design on the cereal card box for the 5cm Black Straws Snoot Grid.
This fits on SB26 and 580EX:
7cm, 4,5cm, 7cm, 4,5cm, 1cm and length 8cm
This will give 5cm for the straw and the other 3 to fit in the flash.
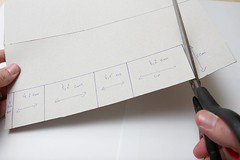
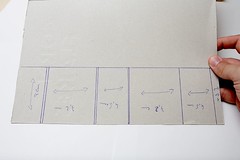
Cut with scissors the card box as showed.
After cutting the card box use the ruler to help you bend the card box on the marks.

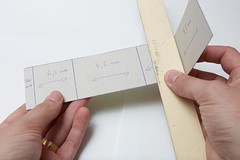
After bending all the parts here is how it should become.
After bending all the parts here is how it should become. Do not glue it yet!! On my left hand you can see the 1cm part that will be for assembling the structure together.
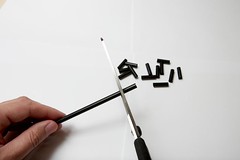
Cut the straws with scissors and pay attention that they tend to pop out after each cut ;). Illustration for the 2cm cut for the 5cm is the same only the straw pieces would come out bigger.
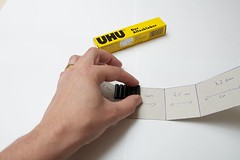
Now it's time to glue them to the card box. Start to glue them to the longest part of the card box this way will be easier to glue everything later on.
Start to align them at the front of the card box... don't mind if the back part (the one that stays inside the card box) is not precisely align it will work anyway. What you have to keep in mind is to align the front.
Here you can see some of the straws on the back are not aligned but they are glued :)
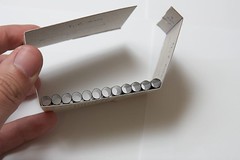
First row now glued this is what it will look like after all of them are glued. Carry on gluing...
A couple of rows later...
A couple of rows later...
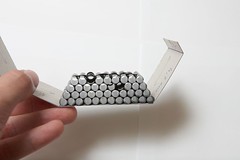
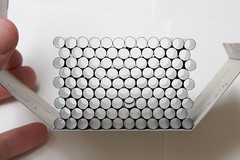
Try it out before you close it... this way you can ad or remove straws so it can stay aligned.
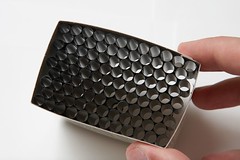
The inside after all the gluing has finished.
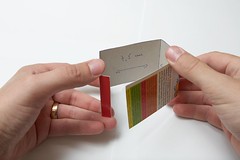
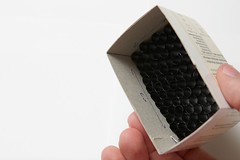
Done. This is how it look after it's finished.
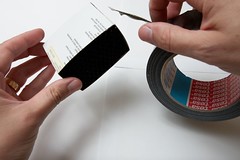
Now tape it to look more professional and to cover those unpaid ads :)
Here are the 5cm (L) and the 2cm (R) with that black tape professional look :), just look through them, you can even see what will be coming out of this...
Hope you like this photo tutorial and make use of this tools since they are very good and if you loose one you can always make another ;)
Don't miss part 2 of this series since it will bring you some examples how you can use your new Black Straws Snoot Grids.
Until next time... go shoot!!!
here is a new idea you can start doing by yourself.
When I was on one of my trips, this time to London, for a great Strobist Seminar we went into a Mexican restaurant and as by David advice on getting all the Black Straws you could pick I decided to try my luck.
I ask the waitress if I could get some black straws and she just said grab the one's you like... so as you can imagine I took 2 hands full of it !!!! :)
Later on I decided that was time to put together the so talked snoot grid but I could not imagine how to assemble it, since I have never did it before. I then realized that a lot of people also did not bother to assemble it, maybe because of lacking how or because they simply did not know what was it all about.
In this 2 parts simple "Do It Yourself" we take a look first on how to assemble the "THING" and then on the second part I will do some examples on what you could come up with them.
Hope you enjoy it and come back soon for the second part.
Working table with all the gear needed to assemble the Black Straws Snoot Grid.
- Black duct tape
- Cereal Box (Any type or any kind)
- Scissors
- Glue
- Hand full of Black Straws (0,5 cm diameter)
- Ruler
- Portable flash to try it out later
- Pen
This is the design on the cereal card box for the 2cm Black Straws Snoot Grid. There is an error on the calculation between the picture and the real thing since I have some Velcro at the flashes end and it gives 0,2cm more to each side (If you have the Velcro at the end of your flash use the measures on the picture instead), sorry but I only noticed it now here goes correct the measures:
1cm, 4,5cm, 7cm, 4,5cm, 7cm and length 5cm
This will give 2cm for the straw and the other 3 to fit in the flash and will fit on SB26 and 580EX
This is the design on the cereal card box for the 5cm Black Straws Snoot Grid.
This fits on SB26 and 580EX:
7cm, 4,5cm, 7cm, 4,5cm, 1cm and length 8cm
This will give 5cm for the straw and the other 3 to fit in the flash.
Cut with scissors the card box as showed.
After cutting the card box use the ruler to help you bend the card box on the marks.
After bending all the parts here is how it should become.
After bending all the parts here is how it should become. Do not glue it yet!! On my left hand you can see the 1cm part that will be for assembling the structure together.
Cut the straws with scissors and pay attention that they tend to pop out after each cut ;). Illustration for the 2cm cut for the 5cm is the same only the straw pieces would come out bigger.
Now it's time to glue them to the card box. Start to glue them to the longest part of the card box this way will be easier to glue everything later on.
Start to align them at the front of the card box... don't mind if the back part (the one that stays inside the card box) is not precisely align it will work anyway. What you have to keep in mind is to align the front.
Here you can see some of the straws on the back are not aligned but they are glued :)

First row now glued this is what it will look like after all of them are glued. Carry on gluing...
A couple of rows later...

A couple of rows later...
Try it out before you close it... this way you can ad or remove straws so it can stay aligned.
The inside after all the gluing has finished.
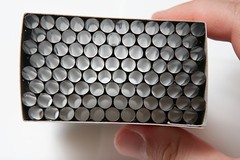

Done. This is how it look after it's finished.
Now tape it to look more professional and to cover those unpaid ads :)
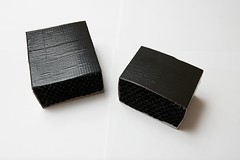
Here are the 5cm (L) and the 2cm (R) with that black tape professional look :), just look through them, you can even see what will be coming out of this...
Hope you like this photo tutorial and make use of this tools since they are very good and if you loose one you can always make another ;)
Don't miss part 2 of this series since it will bring you some examples how you can use your new Black Straws Snoot Grids.
Until next time... go shoot!!!
PANORÁMICAS DE 360 GRADOS DE DIFERENTES LUGARES DEL MUNDO.
Gracias Carmen por enviarme este correo.
Para cuando tengas tiempo libre, para cuando te apetezca, para viajar desde tu butaca, para que te entretengas, y para que lo disfrutes
EVEREST : ---------------------------
PARQUE OLIMPICO DE MUNICH :---------------- http://www.panoramas.dk/2008/
LAGO MORAINE :-----------------------------
ROMA:-------------------------
YELLOSTONE:-------------------
GRECIA:-----------------------
ALARCÓN:----------------------
FESTIVAL INTERNACIONAL DEL GLOBO (BRISTOL) :http://www.panoramas.dk/2008/
LAGO ANNECY:----------------------
TIME SQUARE (AÑO NUEVO):--------------------htt
SIDNEY:-----------------------
NEW YORK:------------------------
CAPILLA SIXTINA:---------------------
PLAZA DE SAN MARCOS:-----------------------
SUECIA: ------------------------------
CASTILLO DE BUDAPEST:---------------------
BIBLIOTECA:-------------------
GRAN CAÑÓN:-------------http://
GRAN CAÑÓN:-----------http://www.
ES CALÓ DE SAN AGUSTI:--------------http://
domingo, 24 de julio de 2011
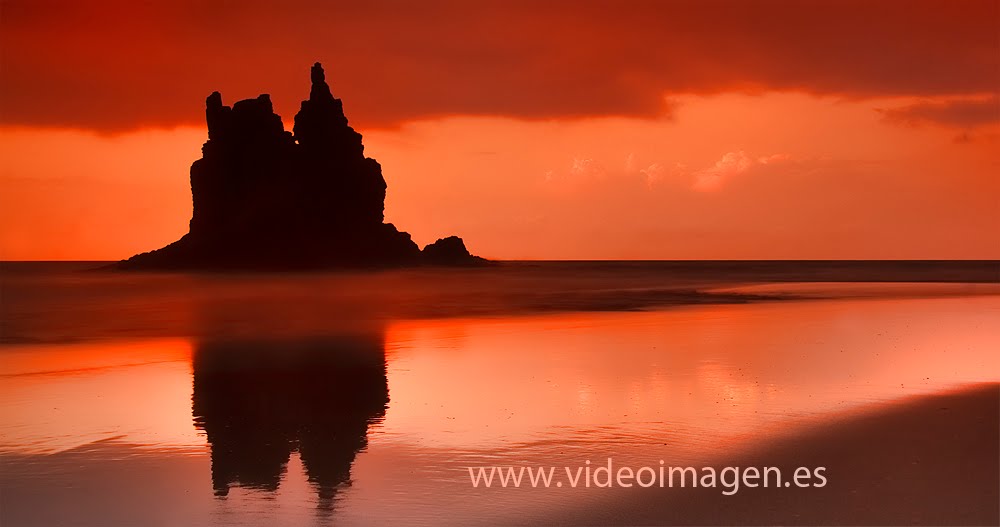
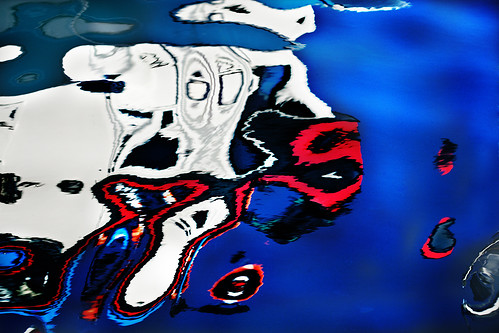
REFLEJOS
Esta tarde sali a dar un paseo en busca de algún ave, para practicar la fotografía de velocidad. Pero no se me dio bien. Al final me entretuve en sacar algún que otro reflejo.
martes, 19 de julio de 2011
PLANTILLA CORTE DE PELO ADOBE PHOTOSHOP
Plantillas gratis de cortes de pelo adobe photoshop. Plantillas gratis peinados de moda adobe photoshop.
![]() Bajar plantilla.
Bajar plantilla.

lunes, 18 de julio de 2011
EFECTOS DE SONIDO GRATUITOS. BANCO DE SONIDOS DE VIDEOIMAGEN.ES
Efecto de sonido Viento del Polo Norte.
Bajar sonido.
Bajar sonido.
¿QUE ES LA DISTANCIA HIPERFOCAL?
Dentro de mis apuntes de fotografía voy a pegar este artículo muy interesante obtenido de esta página web:

Concretamente este fantástico artículo:
La distancia hiperfocal es la distancia de enfoque en la que se consigue la mayor profundidad de campo, extendiéndose ésta desde la mitad de dicha distancia hasta el infinito. Enfocar en dicha distancia nos ayudará a obtener la máxima nitidez en nuestras fotos, por ejemplo, de paisajes.

En el siguiente ejemplo, la distancia hiperfocal que nos permitía obtener la máxima profundidad de campo y así dejar todo lo más nítido posible era 6 metros. Así, nos situamos a 6 metros del sujeto, lo enfocamos y obtenemos la máxima profundidad de campo, que se extiende desde la mitad de la distancia, 3 metros, hasta el infinito.
La distancia hiperfocal depende de la distancia focal de nuestra lente, de la apertura de diafragma utilizada y del factor de recorte del sensor de nuestra cámara. Así ira variando en función del zoom que apliquemos, del número f ajustado y el modelo de nuestra cámara.
Evidentemente no nos vamos a ir a hacer fotos con un metro y a la hora de aplicar esto lo haremos de forma aproximada. También puede ayudarnos mucho el botón de previsualización de campo, que nos permite previsualizar en el visor la profundidad de campo de que dispondremos con los ajustes actuales de la cámara.
En la siguiente foto utilicé una distancia focal de 17mm, en una cámara con un factor de conversión de 1,6 y una apertura de diafragma de f/10. La distancia focal con esos datos es de 1,5 metros. Así, si me coloco a 1,5 metros del cartel que pone “Les Grassonnets” y enfoco en él la imagen saldrá totalmente nítida, desde 0,75 metros hasta el infinito. Así vemos cómo tanto la nieve del primer plano como toda la carretera hasta el horizonte está totalmente nítido.

- f/2,8: Distancia focal de 23,3 metros. Enfocando a 23,3 metros obtenemos una imagen nítida desde 11,6 metros hasta el infinito.
- f/8: Distancia focal de 8,2 metros. Enfocando a 8,2 metros obtenemos una imagen nítida desde 4,1 metros hasta el infinito.
- f/22: Distancia focal de 3 metros. Enfocando a 3 metros obtenemos una imagen nítida desde 1,5 metros hasta el infinito.

- 35mm: Distancia focal de 8,2 metros. Enfocando a 8,2 metros obtenemos una imagen nítida desde 4,1 metros hasta el infinito.
- 50mm: Distancia focal de 16,7 metros. Enfocando a 16,7 metros obtenemos una imagen nítida desde 8,35 metros hasta el infinito.
- 100mm: Distancia focal de 66,7 metros. Enfocando a 66,7 metros obtenemos una imagen nítida desde 33,35 metros hasta el infinito.

Cálculo de la distancia hiperfocal
La fórmula de la distancia hiperfocal es:H=(F*F)/(f * d)
H= distancia hiperfocal
F = Distancia focal del objetivo
f = apertura del diafragma
d = diametro del circulo de confusion.,.
F = Distancia focal del objetivo
f = apertura del diafragma
d = diametro del circulo de confusion.,.
El circulo de confusión es una constante diferente para cada formato de negativo o sensor. De ahí que el factor de recorte afecte a la distancia hiperfocal. Buscando por internet se puede encontrar dicho factor de cada cámara.
Para calcular la distancia hiperfocal podemos utilizar tablas como la siguiente:
Como todos los cálculos variarán entre un modelo de cámara u otro por el factor de recorte ¿qué podemos hacer para poder disponer de esta información en tiempo real? Podemos buscar en internet una tabla de hiperfocales por el modelo de nuestra cámara. También podemos descargarnos de Luces y Fotos un fichero Excel para construirnos nuestras tablas adaptadas a nuestros objetivos y cámara e imprimirlas en tamaño tarjeta de crédito. También podemos descargarnos la aplicación DOFMaster Hyperfocal Chart para generar nuestras propias tablas de hiperfocales. Sin embargo para mí lo más cómodo ha sido instalar una aplicación JAVA en mi móvil, obra de Clip de Canonistas, para calcular sobre la marcha la distancia hiperfocal introduciendo los datos de mi toma.
|
POSE DE MODELOS
Poses de modelos.


Sam Rambo está de moda / Glamour fotógrafo con sede en Kennewick WA. Que trabajan de cerca con Jeans Cacao de la compañía. Revista workin GlamModelz.


sábado, 16 de julio de 2011

viernes, 15 de julio de 2011
BANCO DE SONIDOS DE VIDEOIMAGEN.ES
Efectos de Sonido de la Naturaleza
Efectos de sonido naturales.
Aquí les traigo para la colección de sonidos de efectos de vídeo este correspondiente a el mar agitado.
Efecto de sonido mar agitado.
Bajar fichero.
Efectos de sonido naturales.
Aquí les traigo para la colección de sonidos de efectos de vídeo este correspondiente a el mar agitado.
Efecto de sonido mar agitado.
Bajar fichero.


lunes, 11 de julio de 2011

viernes, 8 de julio de 2011
POSE DE MODELOS JUVENILES.
Poses de modelos juveniles. Retratos juveniles.


Guía de poses de modelos. Ideas de poses de modelos.
La revista De 15 fiesta ha publicado un reportaje de donde se pueden obtener ideas para poses de modelos:
jueves, 7 de julio de 2011

miércoles, 6 de julio de 2011

martes, 5 de julio de 2011

lunes, 4 de julio de 2011

domingo, 3 de julio de 2011

PLANTILLAS INFANTILES ADOBE PHOTOSHOP
Plantilla de perritos adobe Photoshop. Plantilla de 101 dálmatas adobe photoshop.

ATAJOS DE TECLADO ADOBE PHOTOSHOP
Aquí tienes todos los atajos de teclado para Adobe Photoshop CS3, CS4, CS5.
Me envían un correo diciendo que este trabajo ha sido realizado por
PHOTOSHOP PARA NIÑOS MALOS www.javierherrero.es/podcast
Disculpa las molestias causadas, recibí estos ajatos por correo electrónico y los publique en la web.
No sabía que tenían copyright.

Me envían un correo diciendo que este trabajo ha sido realizado por
PHOTOSHOP PARA NIÑOS MALOS www.javierherrero.es/podcast
Disculpa las molestias causadas, recibí estos ajatos por correo electrónico y los publique en la web.
No sabía que tenían copyright.


Suscribirse a:
Entradas (Atom)